Markdown Here!
- 2013 年 07 月 11 日
- Life
今天写邮件的时候想到,如果Gmail能提供一个插件用Markdown来写邮件,那邮件排版该多么容易!
于是xp就搜了下GMail Lab, 很遗憾的是,没有,说好的谷人希呐?
我心想,总归有其他程序员也想到这种问题写个插件什么的,于是就Google了一下。你别说,还真有!
当当当~当!下面隆重推荐Markdown Here插件。
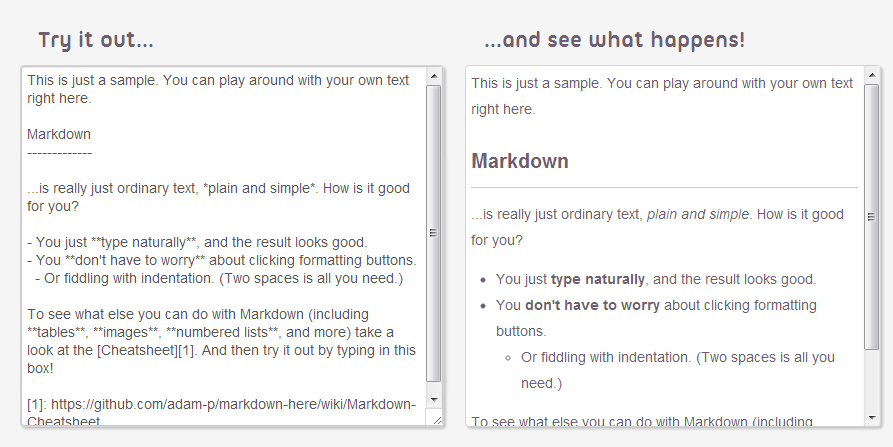
盗一张官网Github README里的图:

实际使用中,用户需要在GMail的撰写界面填写好Plain Markdown代码。写完后,点击一下Chrome的Markdown Here Toggle按钮,就自动把Markdown代码转化成了排版好的Rich HTML邮件内容。嗯?是不是很方便?
没用过Markdown的人是体会不到的啦。。
作者在插件介绍页面提到了自己编写插件的动机(翻译):
…
直到现在,为邮件排版都是一个头痛的事。 如果你经常写长而复杂的邮件,你会发现自己总是在不停地重复 为排版做一些麻烦事:选择文本,点击排版按钮,然后继续为剩下的内容做类似的蛋疼体力活。这样既沉闷, 让人沮丧,而且还慢! 是不是很耳熟?
Markdown Here 允许你只用键盘就能用简单的代码撰写复杂格式的邮件。写完后,你所要做的仅仅是多点击一下鼠标,就可以发送邮件了。
写邮件用的语言叫做Markdown, 它…实在是太简单了,简单到不值得去介绍。
…
效果示例:
跟GitHub的Markdown形式类似,我们可以方便的在邮件里插入经过着色加亮的代码块,以如下格式:
```cpp
int main(int,char**)
{
  printf("Hello world!\n");
  return 0;
}
```
会自动转换成:
int main(int,char**)
{
  printf("Hello world!\n");
  return 0;
}
Markdown Here不仅仅只支持GMail邮件。只要是支持富内容编辑(Rich Editing)的都可以通过这个插件简化排版。 官方wiki列出了支持的列表。
另外,这个插件可以在插件选项页面修改CSS设置,来定制排版风格。比如,我想修改默认字体修改成自己常用的Trebuchet:
.markdown-here-wrapper {
  font-family: 'trebuchet ms',sans-serif;
}
总之,妈妈再也不用担心邮件的排版问题了。木蛤蛤。
遗憾的是这种转换是单向的。已经发出去的邮件,我们是无法把已经转化的邮件内容再还原为为Markdown文本,这给我们将来编辑修改之前的邮件风格产生了不便,除非自己在本地保留一份Markdown格式的原本,或者使用一些把HTML转化成Markdown文本的工具。
希望作者或者社区的人能增加反向转换功能啊!谜之声,这个不是开源的吗为什么你自己不去干?
附上我的Markdown Here的CSS:
>> 继续阅读 <<Cross-platform development notes on OpenCL(英文)
- 2013 年 06 月 21 日
- opencl
Introduction
During the days developing OpenCV’s OpenCL module, we the OpenCV group encountered numerous platform-specific challenges. Cross-platform development on OpenCL is not easy and we need to enumerate every combinations of a valid OpenCL context:
- the OpenCL solution providers, for example, AMD, nvidia, Intel and even Apple (Mac OS) have their own implementations for OpenCL standards;
- different devices, for example, AMD/Intel iGPU’s, AMD/nvidia dGPU’s and Intel/AMD CPU’s;
- different versions of display drivers and SDK’s;
- bitness (x86 or x64) of the system;
- different system platforms such as Linux, Windows and Mac OS;
- the OpenCL version (1.1 or 1.2).
It is our task to make sure all of them work properly eliminating platform specific differences while preserving good performance at the same time.
However this looks frustrating enough, the known cross-platform development issues, including “black screen” or “screen freeze”, program crash and various accuracy problems are usually caused by similar patterns of errors. This article is to summarize the practices we found in trials and errors while digging out cross-platform solutions. It also means to provide a guide and a standard for developers to avoid cross-platform OpenCL development pitfalls and at the same time to achieve best performance.
Here, we publish the cross-platform development notes which may make life easier for people whether in OpenCV’s OCL module development or other OpenCL related projects. In the meantime, please keep in mind that some contents maybe out-of-date due to bugfixes in new releases of OpenCL drivers/SDK.
>> 继续阅读 <<Website update
- 2013 年 06 月 06 日
- Life

在Windows上建立Jekyll平台
为了本地调试搭建好的博客,我们得在当前机器上安装一个Jekyll服务,在本地生成完毕后再把更新push到github上面。 笔者主要的开发环境是在Windows上,但Jekyll官方文档并没有提供在Windows上面安装的方法。 按照网上的各种教程,总算是成功在Win 7/8上面搭建成功了Jekyll。相对于Mac和Ubuntu(Debian),在Windows上部署Jekyll有一些额外的修改。 为了给后来人提供方便,这篇文章我就介绍一下如何一步一步在Windows 7 x64上搭建一个支持中文的Jekyll系统。
首先, 从官网上下载Ruby on Windows,Ruby DevKit和Python 2.7。
下载页:http://rubyinstaller.org/downloads/。在写这篇文章的时候,作者安装的分别是: Ruby 2.0.0-p195 (x64) 和 DevKit-mingw64-64-4.7.2-20130224-1432-sfx.exe。
安装好上述的文件包后,以管理员模式打开控制台,进入Ruby DevKit的目录下(比如D:\rubydevkit),执行下面的语句,对DevKit初始化:
D:\rubydevkit\>ruby dk.rb init
然后,继续安装:
D:\rubydevkit>ruby dk.rb install
接下来,设置gem环境,删除默认的下载源,然后把下载源改成淘宝的镜像(原因你懂的)。
D:\rubydevkit>gem sources --remove https://rubygems.org/
D:\rubydevkit>gem sources -a http://ruby.taobao.org/
D:\rubydevkit>gem sources -l
*** CURRENT SOURCES ***

http://ruby.taobao.org
# 请确保只有 ruby.taobao.org
D:\rubydevkit>gem install rails
现在就可以在gem环境下安装Jekyll了,执行:
D:\rubydevkit>gem install jekyll
Warning!
现在还没有完! 为了确保Jekyll能正确使用,我们还得对Jekyll的代码加上两个补丁。1,Jekyll的header和tag默认不支持UTF-8,我们需要修改以下两个文件:
--- rubypath\lib\ruby\gems\2.0.0\gems\jekyll-1.0.2\lib\jekyll\convertible.rb
+++ rubypath\lib\ruby\gems\2.0.0\gems\jekyll-1.0.2\lib\jekyll\convertible.rb
@@ 搜索替换下面这行
-   source = File.read(@file)
+   source = File.read(@file, :encoding => "utf-8")

--- rubypath\lib\ruby\gems\2.0.0\gems\jekyll-1.0.2\lib\jekyll\tags\include.rb
+++ rubypath\lib\ruby\gems\2.0.0\gems\jekyll-1.0.2\lib\jekyll\tags\include.rb
-   self.content = File.read(File.join(base, name))
+   self.content = File.read(File.join(base, name), :encoding => "utf-8")
--- rubypath\lib\ruby\gems\2.0.0\gems\jekyll-1.0.2\lib\jekyll\generators\pagination.rb
+++ rubypath\lib\ruby\gems\2.0.0\gems\jekyll-1.0.2\lib\jekyll\generators\pagination.rb
@@ -92,8 +92,9 @@ def self.subdirectories_identical(paginate_path, page_dir)
-   format = File.basename(site_config['paginate_path'])
-   format.sub(':num', num_page.to_s)

+   format = site_config['paginate_path']
+   format = format.sub(':num', num_page.to_s)
+   File.basename(format)